Techartists doin’ it for themselves: A Python REPL in Unity
Posted on Sun 22 December 2013 in blog
Last time, I sketched out the basics of embedding a Python intepreter into Unity. That’s cool enough — but unless you’re so desperate for Python that you’re willing to script your whole application inside of triple quotes it doesn’t have a ton of immediate applications.
So, this time out I’ll sketch out how to build a simple script editor inside of Unity (at the risk of repeating myself, I’ll just say again that the extensibility of the Unity editor is an incredible aid to game developers of all stripes, and to tech artists in particular — it’s pretty amazing you can hack in something this complex without source code access or esoteric C++ chops.
Prologomena
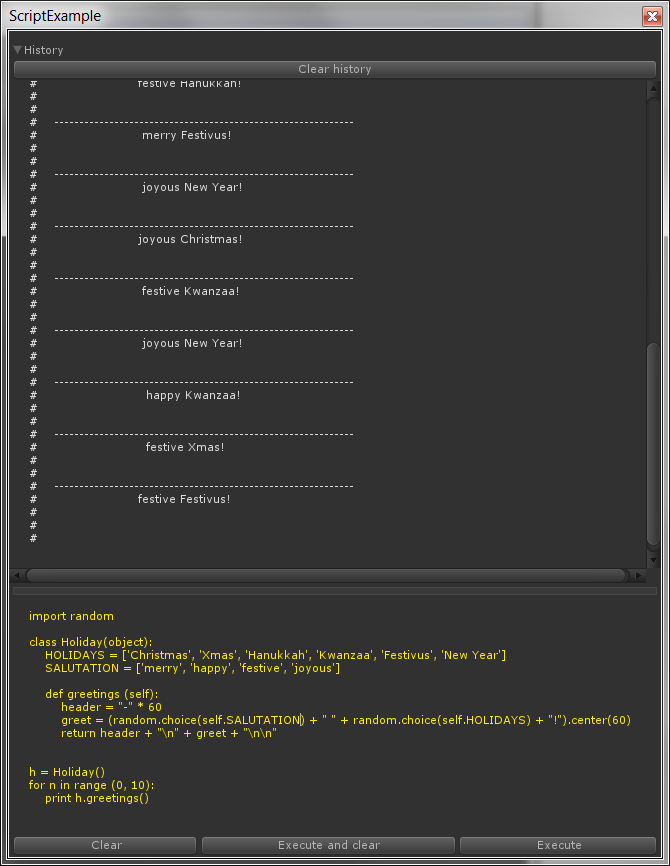
The basic strategy for this excersize is simply to create a Unity window with two panes - a ‘history’ pane and a ‘script’ pane — and before you ask, yes, it’s just a ripoff of the Maya listener.
Before setting up the GUI, we need to cover the framework - the code that will keep the GUI stat and also set up the Python intepreter. In this example, you’ll see a bunch of properties declared for the use of the GUI - notably historyText and scriptText, which hold the actual contents of the listener and the history pane. The other notable feature is the same duo of ScriptEngine, and ScriptScope which we went over in the last post.
If those terms don’t mean anything to you you might want to follow that link before proceeding).
 using UnityEngine;
 using UnityEditor;
 using IronPython;
 using IronPython.Modules;
 using System.Text;
 using System.Collections.Generic;
 using Microsoft.Scripting.Hosting;
 // derive from EditorWindow for convenience, but this is just a fire-n-forget script
 public class ScriptExample : EditorWindow
 {
     // class member properties
     Vector2 historyScroll;
     Vector2 scriptScroll;
     bool showHistory = true;
     int historyPaneHeight = 192;
     string historyText = "history";
     string scriptText = "script";
     string lastResult = "";
     TextEditor TEditor;
     GUIStyle consoleStyle = new GUIStyle ();
     GUIStyle historyStyle = new GUIStyle ();
     Microsoft.Scripting.Hosting.ScriptEngine ScriptEngine;
     Microsoft.Scripting.Hosting.ScriptScope ScriptScope;

     // initialization logic (it's Unity, so we don't do this in the constructor!
     public void OnEnable ()
     {
         // pure gui stuff
         consoleStyle.normal.textColor = Color.yellow;
         consoleStyle.margin = new RectOffset (20, 10, 10, 10);
         historyStyle.normal.textColor = Color.white;
         historyStyle.margin = new RectOffset (20, 10, 10, 10);

         // load up the hosting environment
         ScriptEngine = IronPython.Hosting.Python.CreateEngine ();
         ScriptScope = ScriptEngine.CreateScope ();

         // load the assemblies for unity, using types
         // to resolve assemblies so we don't need to hard code paths
         ScriptEngine.Runtime.LoadAssembly (typeof(PythonFileIOModule).Assembly);
         ScriptEngine.Runtime.LoadAssembly (typeof(GameObject).Assembly);
         ScriptEngine.Runtime.LoadAssembly (typeof(Editor).Assembly);
         string dllpath = System.IO.Path.GetDirectoryName (
             (typeof(ScriptEngine)).Assembly.Location).Replace (
             "\\", "/");
         // load needed modules and paths
         StringBuilder init = new StringBuilder ();
         init.AppendLine ("import sys");
         init.AppendFormat ("sys.path.append(\"{0}\")\n", dllpath + "/Lib");
         init.AppendFormat ("sys.path.append(\"{0}\")\n", dllpath + "/DLLs");
         init.AppendLine ("import UnityEngine as unity");
         init.AppendLine ("import UnityEditor as editor");
         init.AppendLine ("import StringIO");
         init.AppendLine ("unity.Debug.Log(\"Python console initialized\")");
         init.AppendLine ("printbuffer = sys.stdout = StringIO.StringIO()");
         var ScriptSource = ScriptEngine.CreateScriptSourceFromString (init.ToString ());
         ScriptSource.Execute (ScriptScope);
     }

    public  void OnGUI (){} // see next code snippet
 }
As in the last example you’ll also not that we’re manually setting up sys.path to point at the directory where IronPython is installed, with a little extra code to make it portable (dotNet assemblies can tell you where they live on disk, so it’s a cheap shortcut to find your install directory).
The only thing in here that is really ‘architecturally’ important its this line:
init.AppendLine ("printbuffer = sys.stdout = StringIO.StringIO()");
What’s going on there is that we’re replacing sys.stdout - which in ordinary Python points at the user’s console - with a StringIO object. StringIO mimicks a file — and so does sys.stdout. By stuffing printbuffer in there we are hijacking any calls to print that you might make in a script so we can print them out in our UI. This is trick should be familiar to tech artists who need to grab the Maya console for nefarious purposes.
Unity GUI - the good, the bad, and the ugly
Unity’s GUI toolkit is notoriously wonky, and you’ll see as we go along that much of the energy here is devoted to working around it’s limitations. While we can go pretty far just using the basics, the is a certain Rube Goldberg quality to what follows. You’ve been warned.
First let’s just layout out the actual drawing call - the OnGUI method of our window:
 using UnityEngine;
 using UnityEditor;
 using IronPython;
 using IronPython.Modules;
 using System.Text;
 using System.Collections.Generic;
 using Microsoft.Scripting.Hosting;
 // derive from EditorWindow for convenience, but this is just a fire-n-forget script
 public class ScriptExample : EditorWindow
 {
    /* snip... see previous example for the setup code... */

     public void OnGUI ()
     {
         HackyTabSubstitute ();  // this is explained below...

         // top pane with history
         showHistory = EditorGUILayout.Foldout (showHistory, "History");
         if (showHistory) {
             EditorGUILayout.BeginVertical (GUILayout.ExpandWidth (true),
             GUILayout.Height (historyPaneHeight));
             if (GUILayout.Button ("Clear history")) {
                 historyText = "";
             }
             historyScroll = EditorGUILayout.BeginScrollView (historyScroll);
             EditorGUILayout.TextArea (historyText,
                 historyStyle,
                 GUILayout.ExpandWidth (true),
                 GUILayout.ExpandHeight (true));
             EditorGUILayout.EndScrollView ();
             EditorGUILayout.EndVertical ();
         }
         // draggable splitter
         GUILayout.Box ("", GUILayout.Height (8), GUILayout.ExpandWidth (true));
         //Lower pane for script editing
         EditorGUILayout.BeginVertical (GUILayout.ExpandWidth (true),
             GUILayout.ExpandHeight (true));
         scriptScroll = EditorGUILayout.BeginScrollView (scriptScroll);
         GUI.SetNextControlName ("scriptpane");
         // note use of GUILayout NOT EditorGUILayout.
         // TextEditor is not accessible for EditorGUILayout!
         scriptText = GUILayout.TextArea (scriptText,
             consoleStyle,
             GUILayout.ExpandWidth (true),
             GUILayout.ExpandHeight (true));
         TEditor = (TextEditor)GUIUtility.GetStateObject (typeof(TextEditor), GUIUtility.keyboardControl);
         EditorGUILayout.EndScrollView ();
         EditorGUILayout.BeginHorizontal ();
         if (GUILayout.Button("Clear", GUILayout.ExpandWidth(true)))
         {
             scriptText = "";
             GUI.FocusControl("scriptpane");
         }
         if (GUILayout.Button ("Execute and clear", GUILayout.ExpandWidth (true))) {
             Intepret (scriptText);
             scriptText = "";
             GUI.FocusControl("scriptpane");
         }
         if (GUILayout.Button ("Execute", GUILayout.ExpandWidth (true))) {
             Intepret (scriptText);
         }
         EditorGUILayout.EndHorizontal ();
         EditorGUILayout.EndVertical ();
         // mimic maya Ctrl+enter = execute
         if (Event.current.isKey &&
             Event.current.keyCode == KeyCode.Return &&
             Event.current.type == EventType.KeyUp &&
             Event.current.control) {
             Intepret (scriptText);
         }
         // drag the splitter
         if (Event.current.isMouse & Event.current.type == EventType.mouseDrag)
         {historyPaneHeight = (int) Event.current.mousePosition.y - 28;
             Repaint();
         }
     }

 }
If you’re familiar with the dark arts of Unity GUI programming this should be pretty straight forward. If you’re not, the key to understanding it is to remember that Unity uses what old-schooler’s call Immediate mode GUI , in which each control gets evaluated as it is declared . There’s a case to be made that immediate mode is better for performance sensitive applications, but if you’re used to the more typical (aka ‘retained’) mode GUIs in, for example, QT it’s kind of an oddball way to write.
As each GUI element is drawn it reflects and then possibly updates the data that it relies on — so, for example, we pass the string scriptText to the GUI.TextArea that draws the script listener pane - and the results of any changes are immediately passed back into scriptText without the courtesy of a callback. This makes it tricky to manage complex state - as you run down the GUI draw, it’s possible to hit a condition which changes a state and sends you back to the start! This makes it important to keep your state management code very clean and simple.
The one bit that may surprise people who do have some Unity experience its the line
TEditor = (TextEditor)GUIUtility.GetStateObject (typeof(TextEditor),
                                                  GUIUtility.keyboardControl);
The TextEditor class is an undocumented bit of Unity arcana - it is a wrapper on the code that actually handles things like typing, selecting or cutting and pasting into a Unity text field. It has methods for things like setting the cursor location and executing copy-paste operations. Unfortunately, being undocumented, it’s tricky to figure out what to do with it — in this example I’m only using it to preserve the selection position when I do something crazy - as you’ll see in a moment.
Hacktastic
You probably noticed the enigmatic line
HackyTabSubstitute();
which leads up to the tricky bit of this example — and the reason for my earlier hack disclaimer.
Tabs of course are the sine qua non for Pythonistas. Unfortunately Unity catches the tab key before you can grab it, so it’s impossible to ‘type’ a tab into a Unity text field. After banging my head against this for a while, I settled on a pathetic workaround: just cheat and use the tilde key, which is above the tab key on most keyboards and doesn’t have semantic importance in Python. Our new friend HackyTabSubsitute() makes sure that each time the GUI is drawn we replace and backtick characters with indents and any tildes (shift-backtick) with dedents. You can see how we also preserve the cursor position by use of the TextEditor.
// use ` and ~ as substitutes for tab and un-tab
private void HackyTabSubstitute ()
{
string t = scriptText;
string[] lines = scriptText.Split ('\n');
for (int i = 0; i < lines.Length; i++)
{
if (lines [i].IndexOf ('`') >= 0)
{
lines [i] = " " + lines [i]; TEditor.selectPos = TEditor.pos = TEditor.pos + 3;
}
if (lines [i].IndexOf (" ") >= 0 && lines [i].IndexOf ("~") >= 0)
{
if (lines [i].StartsWith (" ")) lines [i] = lines [i].Substring (4); TEditor.selectPos = TEditor.pos = TEditor.pos - 4;
}
lines [i] = lines [i].Replace ("~", "");
lines [i] = lines [i].Replace ("`", "");
}
scriptText = string.Join ("\n", lines);
if (scriptText != t) Repaint ();
}
Assuming you can discipline yourself to use tilde instead of tab, this works like you’d expect, and it supports indents and dedents in any part of the line, which is handy for python edits.
Running the script
As so often happens, it’s the damn GUI which takes all the work. The actual point of this whole excersize is to let you type in some python and execute it. If you trigger an evaluation - with the buttons or with command + enter, you’ll fire the Interpret function:
// Pass the script text to the interpreter and display results
 private void Intepret (string texttointerpret)
 {
     object result = null;
     try {
         Undo.RegisterSceneUndo ("script");
         var scriptSrc = ScriptEngine.CreateScriptSourceFromString (texttointerpret);
         historyText += "\n";
         historyText += texttointerpret;
         historyText += "\n";
         result = scriptSrc.Execute (ScriptScope);
     }
     // Log exceptions to the console too
     catch (System.Exception e) {
         Debug.LogException (e);
         historyText += "\n";
         historyText += "#  " + e.Message + "\n";
     }
     finally {
         // grab the printbuffer stringIO and get its contents
         var printbuffer = ScriptScope.GetVariable ("printbuffer");
         var gv = ScriptEngine.Operations.GetMember (printbuffer, "getvalue");
         var st = ScriptEngine.Operations.Invoke (gv);
         var src = ScriptEngine.CreateScriptSourceFromString ("printbuffer = sys.stdout = StringIO.StringIO()");
         src.Execute (ScriptScope);
         if (st.ToString ().Length > 0) {
             historyText += "";
             foreach (string l in st.ToString().Split('\n'))
             {
                 historyText += "  " + l + "\n";
             }
             historyText += "\n";
         }
         // and print the last value for single-statement evals
         if (result != null) {
             historyText += "#  **" + result.ToString () + "**\n";
         }
         int lines = historyText.Split ('\n').Length;
         historyScroll.y += (lines * 19);
         Repaint ();
     }
     }
}
The heart of the whole business is just
result = scriptSrc.Execute (ScriptScope);
which actually executes the contents of your script window. As in Maya, we’ll copy the evaluated text up to the history pane (historyText += ,etc). If the event of an exception, we print out the exception into the history window as well, and also push a Unity debug message in case you aren’t looking at your console window when the problem arises. Finally, we check to see if the printbuffer StringIO object has been written to duing the script execution and copy it’s contents to the history window too.
V. 0.1
Before starting the first of this pair of posts I was mostly just musing on how TA-friendly Unity is. Building out a complete script editor is a perfect example of TA feature creep in action.
If you implement a script editor using the hints here you’ll quickly see what’s not there things like cut and paste, syntax highlighting, execution of selected text only and support for external files, just to name a few things that would be worth having. And I should mention that this is demo code, it’s not the sort of thing I’d want to turn into a critical path tool without further work.
Even so, it’s been a useful little project. In this holiday season it’s taught me to appreciate my blessings - like how many nice little touches you get with a modern text editor. I’m even feeling more charitable towards the Max and Maya script listeners, since I’ve walked a mile in their sad patheric old worn out shoes.
All that said though, it really is pretty fricking neat that you can add a completely new scripting language to the Unity editor in a couple of hours — and save your self tons of future time by adding cheapo scripts to automate tedious tasks that aren’t worth 200 lines of C# curly brackets.
At some point I’ll address the most obvious failings - lack of cut-n-paste is the clear winner! - but first I want to see about implementing the console in a more flexible GUI - for example, I could pop up a WPF window, or maybe even something truly funky like an in-browser python console.. In the mean time, if anybody takes this further I’d love to hear about it.