The Conquest of Space
One of the hardest thing about working in our business is that the technology evolves faster than our means of talking about it. There are a lot of things which we learn in the course of our work that we have a hard time passing on, because the field is so small and so few of us have leisure to try to find ways to sum up all of the practical knowledge we pick up along the way. I originally wrote this for Game Developer in 2006, and it was always one of my favorite columns.
If I could get one message to you it would be this: the future of this country and the welfare of the free world depends upon our success in space.
– LBJ, 1968
Artists are famous for preferring pictures to words (a certain keyboard-happy ~~columnist~~ blogger we know being a notable exception). But sometimes having a way to talk about something we know by intuition can be really important, even if it seems like stating the obvious. It’s a little unnerving for the fellow who first stands up to tell an audience of smart people stuff they already know by instinct, if not in words. It’s still a useful excersize once in a while.
For a perfect example take color theory. Seeing the world as the interaction of hues, values and saturations, or reds and greens and blues, is not natural. Cnce you’ve spent enough time messing about with color picker windows it may feel like second nature – but it’s actually very sophisticated, very well designed tool that makes your work easier. When you know that value contrasts are stronger than chroma contrasts, designing camoflague or deciding whether a wall texture needs a normal map are much simpler. tasks. Knowing how oversaturated colors mess with the perception of brightness will help you design a paint job for your giant killer robot which enhances, rather than obscures, his 3-d form.
So there can be a lot of value in talking about the basics. This month we’re going to look at a topic that’s as basic to animation as color is to painting. Call it groups, nulls, parenting, bones, joints or whatever piece of jargon you first picked up, the menagerie of terms refers to a single theme: the control of space. Like “color”, space is a simple abstraction that covers a lot of ground. Like color, it demands a little bit of study and thought if it is to be used effectively. Like color, is a concept that becomes more interesting, and more useful, the closer you look at it it.
The Space Program
In it’s simplest form, of course, our kind of “space” is the local transformation node – for example, the hierarchy of bones that makes up an animated character. Ordinary people think of space as something empty and formless, but even novice CG animators know that spaces can be ranked into hierarchies, moved, rotated squashed, and skewed. This is so basic to what we do that we can easily overlook how odd it must seem to the rest of the world. But these special abilities are the reason spaces are so important. Spaces are important because spaces are where things happen. For computer animation, at least, knowing where things happen happen is critical for making them happen without going insane.
Consider a very basic example: Everybody knows that the moon goes around the Earth in a roughly circular orbit. The Earth itself flies around the sun in a huge ellipse. If you try to picture the path of the moon around the sun, you’ll realize it makes a horrendously complex pattern of loops in three dimensions, like a crazy cosmic game of Spirograph. You don’t have to ponder very long to see how painful it would be to set all the keys necessary to describe that path through what ordinary folks would call “space”.

However, with hierarchical spaces every animator knows there’s an easy way out of this. Since the moon orbits the earth, it’s far easier to describe it’s movement relative to the Earth. In an animation package this translates into to parenting the moon to the Earth, so that instead of the super-complex mandala it’s path becomes a simple circle. We’ll gloss over the fact that the earth is rotating too for the moment. Coming up with these examples is hard work, you know.
This is something most us did within days, if not hours, of our first encounter with a 3-d package. But it’s a very simple example of a very sophisticated idea: by picking the right frame of reference, a baroquely complicated movement – the spirograph path of the moon around the sun – becomes a very simple movement. That’s why spaces are important: a movement that’s almost impossible to describe – or to keyframe – in one space may be very simple in another.
Once you understand this concept, it becomes blazingly obvious that a rigger’s job is to find the right spaces.
If your character is walking or running around, you don’t want to have the IK targets for his hands just sitting around in the world. If the hand IK’s don’t live in the space of the body, they’ll have to be manually keyed to match his movement through the scene – a lot of work for no reward. Or, you might have a character who’s pacing around the room while arguing with someone else. If her head is rotating relative to her body, just focusing her gaze on the other character will take a ton of keys as she moves around. If her head is set up to rotate relative to the world (using an orient constraint on a control outside the body hierarchy) or relative to the other character (using an aim constraint), managing the head will be painless.
Working in the right spaces is easier, faster and gives you more energy to focus on character and style, rather than mechanics.
The Right Stuff
The most important question to ask when setting up a control is, “Where does the motion make the most sense?” It’s easier and simpler to describe the motion of the moon relative to the earth than to the sun. It’s easier and simpler do describe the movement of a person in an elevator relative to the elevator. You can tell a good choice from a bad one because bad spatial choices always result in lots of counter-animation. Here’s a simple rule of thumb: Any time the you have to set a key merely to make it look as if nothing has happened, you’re working in the wrong space. You shouldn’t have to run to stay in place.
Counteranimation creates drudge work. Just as bad, it also confuses the relationship between keys and action in the scene. Every key ought to indicate some action in the scene – a change of position, rotation, or acceleration. A counter-animated key, though, doesn’t correspond to any event in the scene, because it’s job is to look as if it weren’t there. This creates messy F-Curves and a hard time for the animator who wants to tweak timings or find out what’s causing a hitch. If your F-Curve or dopesheet is much more complicated than your actual scene, it’s a good bet your rig has poorly chosen spaces.
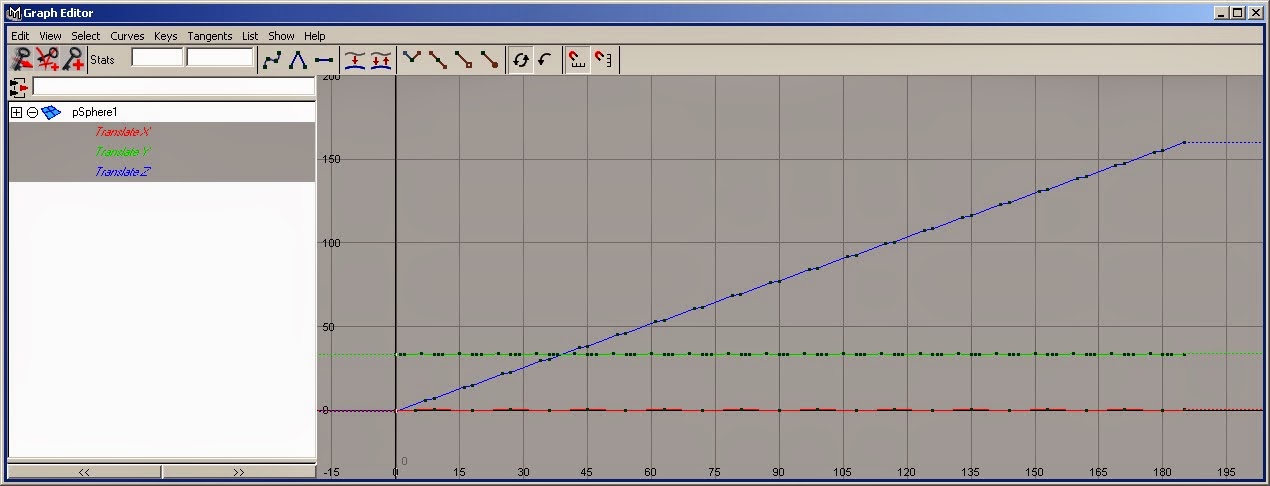
There’s a lot of keys here - what are they all doing?
Good space choices, on the other hand, typically show up as clear, readable curves. Consider the illustration above: this set of F-Curves represents the translation of a character’s root bone as the character walks forward. This set is messy and complicated. The F-Curves below represent the same motion created with one important change in space arrangements:

Abstracting out just the movement of the root from movement through space makes it clear what’s happening
In the second example the character’s hips are parented to a separate node at waist height which handles the forward movement through the world. This very minor change to the rig makes a huge difference to the animator, because the second hierarchy is well matched to the task.
The advantage of the second arrangement can be seen clearly just by looking at the Fcurves. The character’s hips are bouncing and swaying by a few inches, but they are also moving forward several feet. In the first example managing the keys becomes very difficult, because you can’t evaluate the different scales at the same time. Hunting around in the graph view for the curve you want is a waste of time. Sometimes it even makes sense to arrange your controls so that values which “should” be on different scales are closer together in units to make Fcurve management easier – for example, if you’ve got a hand that moves through inch-sized world units and has an IK-FK switching parameter on it, you might want that parameter to run from 0 to 50 or 0 to 100, rather than 0 to 1, to keep both sets of keys in view at the same time.
A more subtle reason why separating the large scale movement from the local one in our example is that the movement combines cyclical elements – the bounce and sway of the hips– with acyclical movement through the world. The cyclical component of the move, which could easily be defined with just a few keys, is held hostage to the acyclical part. If you wanted to alter the hesitation at the heel strike of each footstep, you’d need to change the tangents or move every one of the dozens of forward translation keys. By segregating the cyclical and acyclical moves into different spaces, you can use the looping feature in your Fcurve editor and only work on a single cycle, as the example shows.
The same problem happens when you’re working with multiple movement cycles on a single F-Curve. For example, a rower in a rowboat will bounce up and down (relative to the boat) while working the oars; but the boat itself will moves up and down on the waves. If you animated the rower through the world, you’d be representing both sets bounces on a single, messy curve. Obviously, if the rower is in the space of the boat this is easier to handle. Nobody with any experience would even consider animating the rower independently of the boat – yet riggers and animators often ignore the same type of situation when it comes up in a less blatant form, such as the secondary animation on a tail.
Mission Control
Very simple tweaks to the spatial hierarchy can be very powerful, but sometimes a simple hierarchy can become hard to navigate. In this example, how can we tell what aspect of the movement is coming from the world root or the hips? Overlapping spaces are always dangerous. Unfortunately they’re also unavoidable in a system based on hierarchies. The best method for dealing with this conundrum is to be absolutely clear about the meanings of the different controls.
Just deciding what “meaning” you expect out of a given spatial arrangement can completely change the way a rig behaves. If you took the example of the character above, you can get two very different kinds of performance from the setup simply by being clear about how you want to use that extra root node.
One way you could work with that world root node is to pretend it is the character’s center of gravity, as in this example:
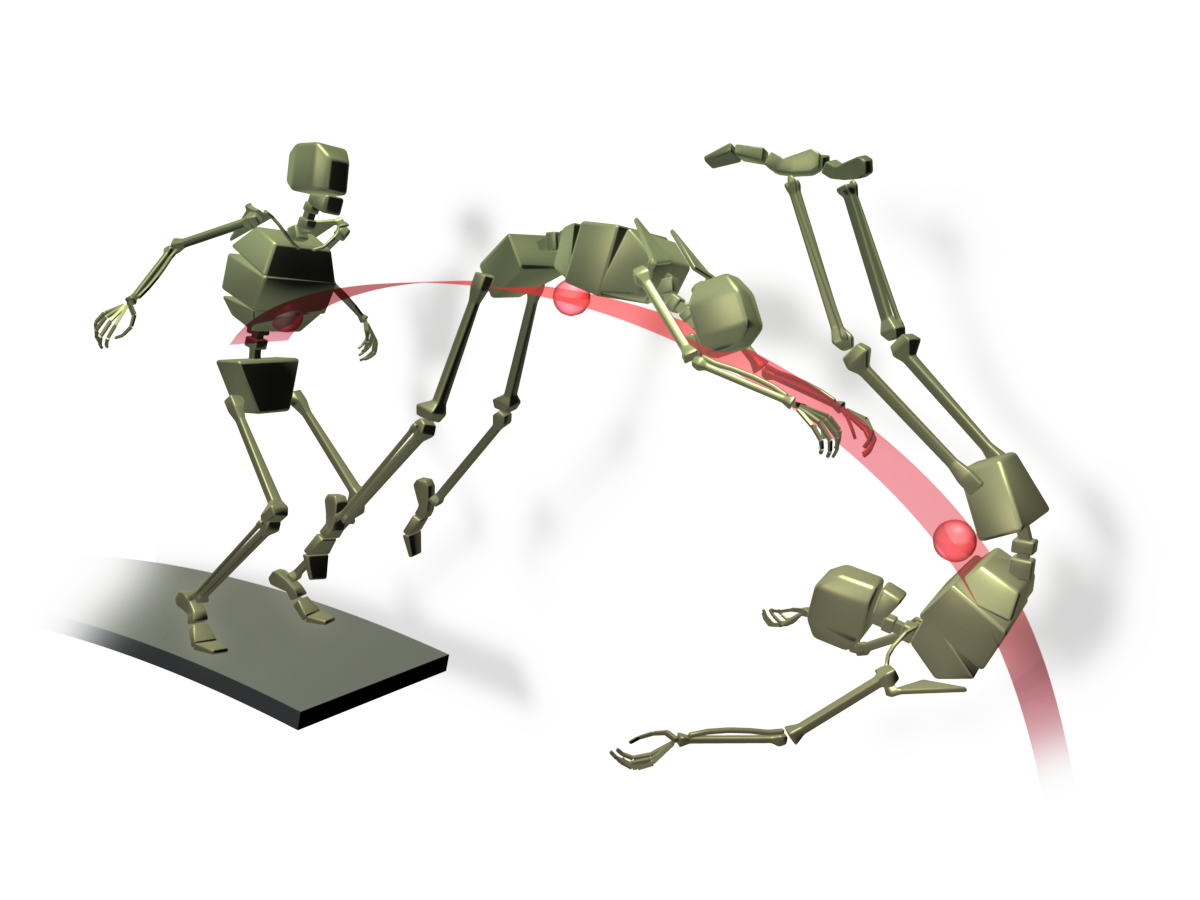
The center-of-gravity node is a logical root space for ballistic moves
This is a great tool for dealing with acrobatic or ballistic moves – rolling, tumbling, diving and so on. In the air your body rotates around your center of gravity, not your hips – so if you try to tumble a character using the hips alone, you’ll end up having to move those hips as much as you rotate them to create the right appearance. It’s far more elegant and simple to simply treat that root node as if it were the center of gravity – you simplify large moves through the world as we’ve already shown, and when the character leaves the ground it can be moved and rotated without any nasty counteranimation.
On the other hand you could use that root node solely to handle those large spatial moves. Most games see characters as just a point and an orientation on the ground plane – so it’s often handy to specify that directly rather than relying on your animation exporter to figure out where the character “really is” for you. You might even use a box-shaped object corresponding to the character’s in-game bounding box as the root so the relationship is completely clear. Here I’ve shown it using a big arrow which makes the character’s frame of reference completely clear:
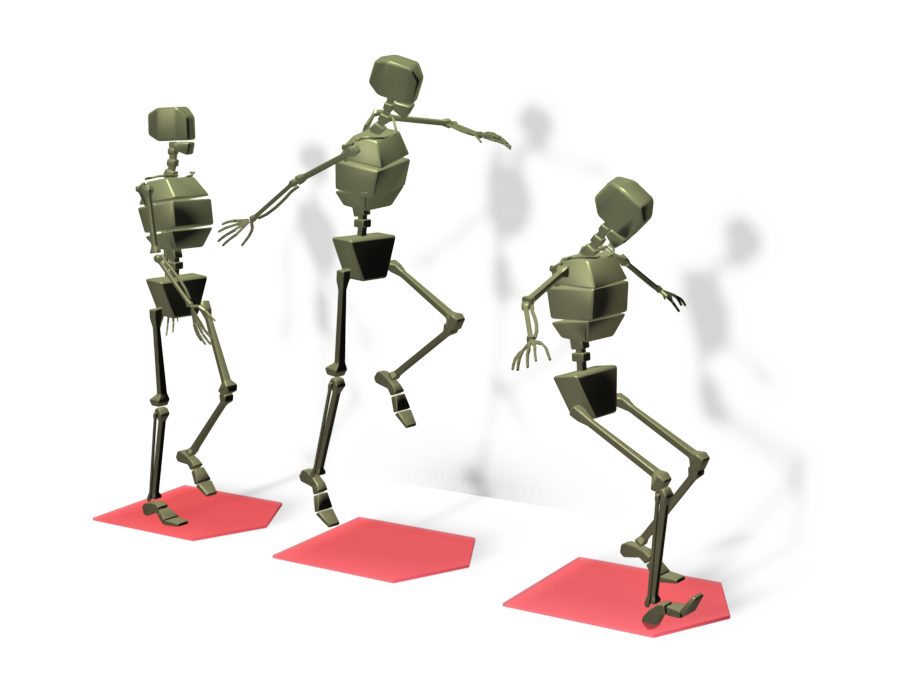
Gluing the world root to the ground changes what the setup is good for. If the root node is locked to the floor and limited to yaw-only rotations it becomes a natural tool animating movement cycles or navigating through the world. It’s also easy to attach it to a motion path curve, a great way to visualize the character’s path through a scene. In this kind of setup it’s often wise to lock the controls you don’t want to play with (such as vertical translation or roll) to make the meaning of the root node unambiguous.
Splashdown
As we said at the outset, sometimes it’s important to step back and think about the basics. The simple example here is about as basic as you can imagine, but it’s a great illustration of a theoretical framework that’s a important to animators as color theory is to painters. Working in a young art form, it can be hard to step back from the day to day business of poly-pushing to see the larger picture of how we do our jobs, but even a little bit of theory can be a very powerful practical tool. Too much theory, of course, and you end up exhibiting yourself naked, covered in chcocolate, in a plexiglass box at the Tate Gallery.
Thankfully this doesn’t happen very often in the games business. It’s a nightmare getting that stuff out of your hair.